27 February 2014

Car Seat Cover

A friend of mine is having a girl after two boys. She was planning on just using the car seat cover with fire trucks on it that she already had, so I thought I'd make her something a little more girly.


13 February 2014

Learning Words


My 5 year old has enjoyed learning to sound out words with these.

08 February 2014

Spring Table Runner


I paper pieced the flowers (patterns found here) and free-motion quilted it on my sewing machine. It was a lot of fun and I love how it turned out.

02 November 2013

Baby Cape

I had a baby in April, hence the long hiatus. For Halloween we went as a family of super heroes, so naturally little sister needed a cape.


29 March 2013

Super Hero Capes

My boys are really into super heroes, so I made them individualized capes to add to their Easter baskets. I started with the younger one's this time, since my second attempt at things always turns out better and my oldest is much more into the whole cape thing. I was right to do so, since I wasn't especially pleased with how the first one turned out. I used a tight zig-zag stitch to assemble the decals and it puckered a lot. The second time around I straight stitched it first, then did the zig-zag and it went much better. I also gave the second one the ability to be lengthened in case it turns out to be something he loves for a long time.

20 March 2013

Easter Baskets


I found this tutorial a couple years ago and started one for my oldest son. I used a really cheap gingham that frayed all over the place and was excessively frustrating to work with. I gave up on the project after completing not much more than the base. I found out that my husband and his siblings had similar baskets growing up, so decided this year I'd scrap my first attempt and try again. I picked some nicer cottons, went through the work to fold and iron all the strips, and while it was tedious and took forever,  I am much happier with the outcome. Unlike the aforementioned tutorial, I took the time to hide my stitches while sewing the rows together (a thimble and pair of small needle nose pliers were absolutely necessary tools for this) and I think it will ultimately make for a stronger, better looking basket. I also learned with the first one not to cut all my strips the same length. The second one I cut the alternating green strips different lengths which made for a more random pattern that I like better. My first basket I tried a handle out of the same cord, but had a hard time attaching it and didn't especially like how it turned out. The second one I covered a stiff ribbon with wiring in it with matching fabric, and while it looks a bit flimsy, I think it will serve it's purpose better. So, probably not the funnest project I've ever done, but I think it will be fun for my kids to have homemade baskets to pull out every spring for years to come.

26 January 2013

More Extension Drawers

I am loving the full extension drawers in my pots & pans cupboard. It's amazing how much more I can fit in the same space in addition to having easier access to everything.


Our initial hope was that this skinny cupboard would become an easy access spice rack, but it didn't conveniently fit the size jars I buy so instead we've filled it with all the vitamins, supplements and random health related bottles kicking around. Perhaps not the best use of space, but it's nice to have it all together out of the reach of little hands.


22 January 2013

Kitchen Pantry

We've been working on fixing up the bedrooms, which means the boys have temporarily moved into my sewing room and it currently looks like this:


Without full/easy access to all my supplies, I've had to focus on some other projects. Over the MLK holiday my husband and I (okay, mostly my husband) did a quick kitchen pantry re-make.

Before


After


We'll add face plates and paint the whole thing eventually, but for now I'm pleased with the increase in space and ease of use.

16 January 2013

Honey Mustard Pretzel Chicken

I found this recipe on Pinterest, made it exactly as the recipe suggested, and we all loved it. My chicken  breasts were pretty thick and it turned out a wee bit dryer than one would hope, but I believe that could be corrected by simply using a smaller cut.


Ingredients:
4 cups hard pretzels (like sourdough), coarsely crushed
1/2 cup olive oil
1/2 cup Dijon mustard
1/3 cup honey
1/4 cup water
3 tablespoons red wine vinegar
coarse salt and pepper
1.5 lbs boneless skinless chicken breasts

Instructions:
Preheat oven to 400 F. Set a wire rack over a large rimmed baking sheet (cover the baking sheet with tin foil to make clean up easier)
  1. In a food processor pulse the pretzels until coarsely ground (small crumbs with some small pretzel pieces) then add them to a large, shallow bowl. Wipe the crumbs out of the food processor.
  2. Add the oil, mustard, honey, water and vinegar to the food processor and pulse until smooth.
  3. Season with salt and pepper. Taste and adjust the flavor to suit your own tastes by adding more mustard or honey.
  4. Pour half of the dressing into a large shallow bowl and add the chicken breasts. Turn to coat them evenly then dredge them in the pretzel crumbs using your hand to pat them on if needed.
  5. Set them on the wire rack and bake 20 - 25 minutes or until cooked through (internal temperature 160 F). 
  6. Let the chicken sit 5 minutes before serving with the remaining honey mustard dressing.

30 December 2012

Chicken Salad with Creamy Roasted Pepper Dressing

I was recently diagnosed with gallbladder disease and have since had to seriously cut out fat from my diet. We were reasonably healthy eaters before, but now I've needed to cut out all animal fats, which for me means dairy products, including eggs. I also need to be especially attentive to the other kids of oils and fats that are in processed foods, as well as those I use to cook with. Pretty much I'm left with olive oil and the occasional lean white meat, and every thing else needs to be fat free. It's been a fun adventure discovering new ways to enjoy produce and making sure my family is getting all the essential nutrients they need. I made this salad tonight and got rave reviews.


For the chicken:
(I used several chicken cutlets because that's what I had, but skinless breasts work well too)

Mix 1 quart water with 1/4 cup table salt and brine chicken for at least 30 minutes and up to 3 hours. Pat dry and rub both sides lightly with olive oil. Season with pepper. For this dish I also used some generic Italian seasoning, but you really could use whatever suits you. Just don't add any more salt, since it's already been brined.  

Place on a foil lined baking sheet and bake in the center of the oven at 350 until the internal temperature reaches 160 degrees. Depending on the size and thickness of your cuts, this can take anywhere from 10 to 30 minutes. I use a probe thermometer that beeps when the meat reaches the right temperature, which takes a lot of guess work out of the process. 

For the Dressing:
(makes about 1 cup)

Roasted red or orange pepper (mine was orange)
Half of a 14 oz. container of soft tofu, drained but not pressed
Light drizzle of olive oil (1/2 to 1 tsp)
Couple drops of habanero sauce (for flavor, not heat)
Salt and pepper to taste

Combine everything in a blender or food processor and enjoy. We ate it warm for dinner, and cold for left overs the next day and liked it both ways.

For the Salad: 

Serve chicken on a bed of fresh spinach with diced tomatoes and dressing. Delicious!

24 December 2012

Christmas Stockings


I started these stockings two years ago, and finally finished the fourth one just in time for Christmas eve. Next year there will be five of us, so I've still got at least one more to make. I think it's a really fun tradition to have mama-made stockings though so I don't mind. 

13 December 2012

Napkins and Table Runner - Twisted Star


This star was a lot of fun to piece. It was a bit more advanced than the ones I've done before and I learned a couple new techniques. I'm super pleased with how it turned out!


07 December 2012

Poinsettia Table Quilt

I made the napkins in the tutorial for my sister and her husband. It's just the two of them and they have a smallish table, so I decided on a square table quilt to act as something of a center piece. I'm really pleased with how it turned out.


05 December 2012

Chocolate Peppermint Chex Mix

I recently discovered Pinterest, which is where I found this fun little treat. I believe they called it reindeer feed or something cutesy like that.


6 cups rice Chex
2 cups white chocolate chips
1/3 cup finely crushed candy canes

Melt the chocolate (either in 30 second increments in the microwave or on the stove over low heat) and add half the candy. Mix the chocolate into the Chex, then spread on a parchment paper lined cookie sheet. Immediately sprinkle the remaining candy over the mix. Give it about 20 minutes to set, then break apart and enjoy. Store any leftovers in an airtight container.

 I still had some crushed up peppermint after I made the white chocolate mix, so I thought I'd try a milk chocolate batch. I personally like brown chocolate better than white, but both turned out yummy.

03 December 2012

Christmas Tree Napkin Tutorial

To make two napkins, you will need 1/4 yard of two different fabrics (that's 1/2 yard total, and means you can make 8 napkins out of 1 yard of each fabric, or a total of 2 yards).

Step 1:
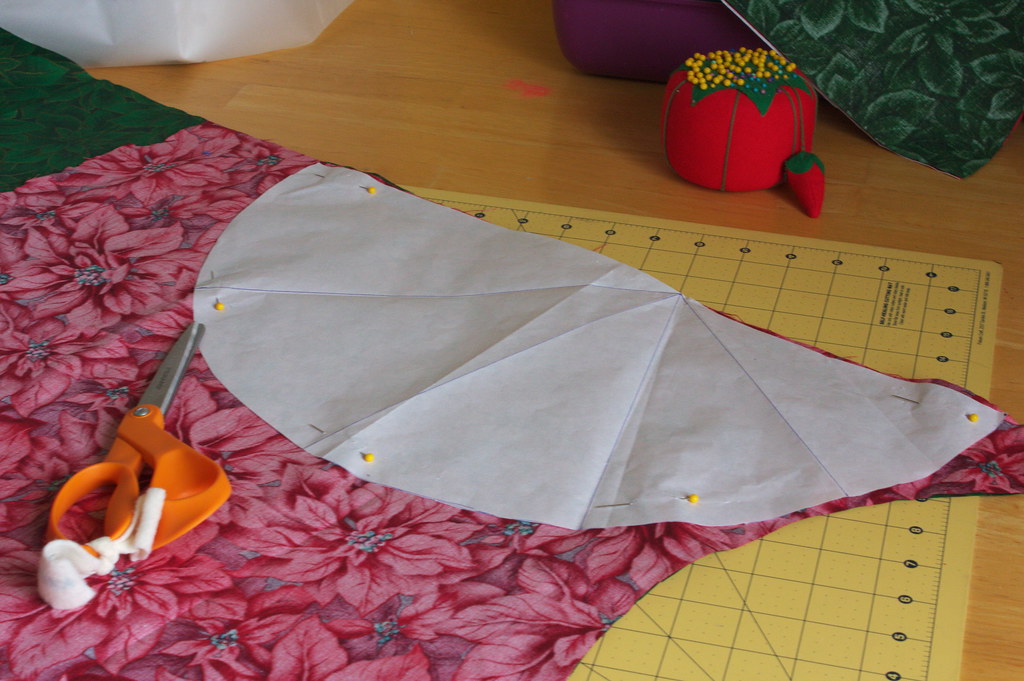
Make your pattern. This is a simple half circle with a diameter of 18 inches.

Step 2:
With right sides together, place your pattern and cut out as many napkins as you plan to make (I found this project went much faster when I did each step to all the napkins before moving on to the next step). Stick a pin or two in each napkin to keep the pieces in place.


Step 3:
With right sides still together, sew a 1/4 inch seam around the whole thing, leaving a few inches open on one side of the straight edge so you can turn it right side out. Clip the corners and make little cuts all around the rounded edge.


Step 4:
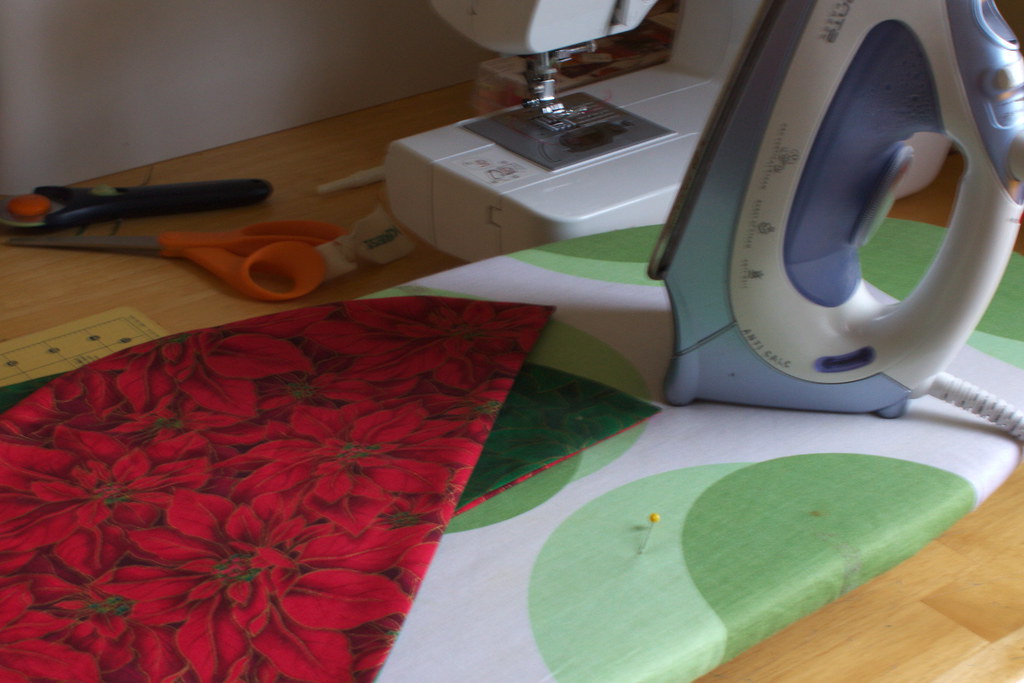
Turn the napkin right side out and use a straight pin to pull out the corners and help the seam lay flat. Iron. I find this to be the most tedious part, especially when you are doing a whole bunch at a time, but making sure the seams are all ironed flat is probably the most crucial step.


Step 5:
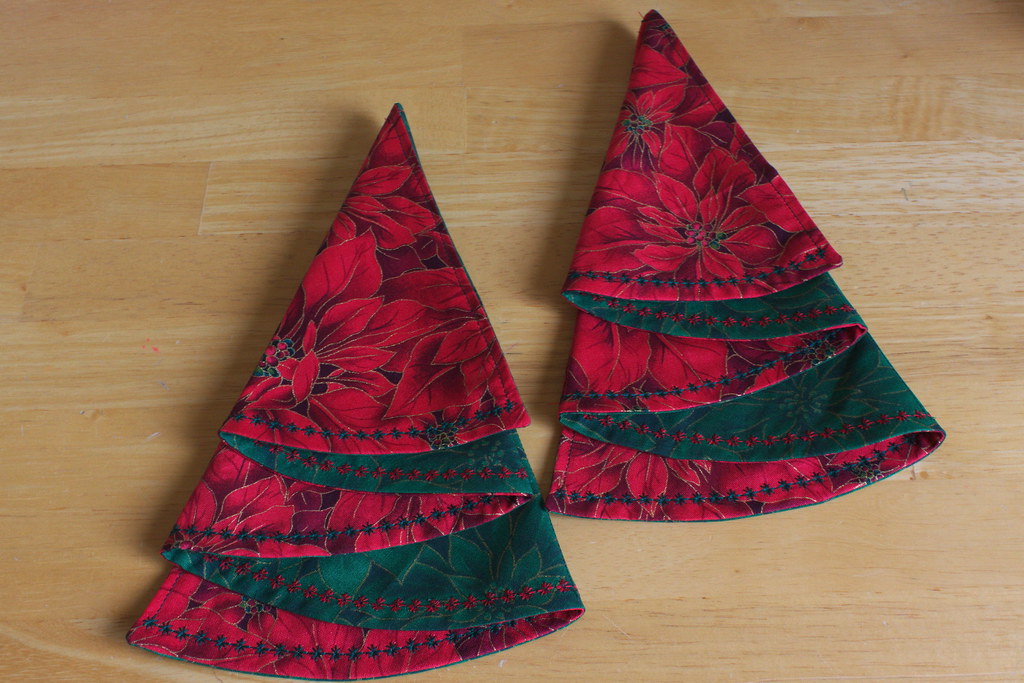
Fold the napkin. Start with the curved side pointing away from you. Place a finger roughly 7.5 inches from the left hand side of the napkin along the straight edge. Fold back the right hand side of the napkin to roughly 7.5 inches up the curved edge, then continue to fold accordion style until you get something that looks like a Christmas tree. Don't worry, the folding is much more intuitive than this description would lead one to believe. Adjust until the edges all line up, then iron. Using thread colors on the top and bottom that will blend in with your fabric, sew a straight line along the creases. This will help future users know where to fold the napkin after it's been laundered. Skip this step if you want your napkins to be reversible.


Step 6: 
Top stitch along the whole border. I used a decorative stitch in contrasting colors along the curved edge, and a straight stitch along the straight side. This is when you will be sewing up the hole used to turn the napkin right side out, so make sure not to skip this step even if you choose not to do any embellishments.

Step 7:
Refold the napkins and iron one more time for a nice crisp look.


29 November 2012

Napkins and Table Runner - Holly & Reindeer

Using the scraps left over from the napkins, I was able to quickly make up this simple table runner. I'm reasonably pleased with the piecing, but the binding did not go as well as I would have liked. I love my Brother CS-6000i, but for being a "quilting" machine, it sure doesn't like sewing through multiple layers.


26 November 2012

Christmas Tree Napkin - Holly & Reindeer

Here's the first iteration of this year's main Christmas sewing project. I'm planning on making several sets for different families, so there will be more pictures forthcoming.


16 November 2012

Birthday Banner Tutorial

I decided last minute to participate in a service auction and needed something to donate, so I quickly made another Happy Birthday Banner. I figured I might as well snap a few pictures along the way and write up a tutorial.

I used flannel fabric in two coordinating colors. The squares are each 5 inches tall x 4.5 inches wide. The letters stand about 3 inches tall. I just found an alphabet template online and printed it off on the computer. I mostly chose those dimensions because that's how much yellow fabric I had. There's no reason you couldn't scale things bigger, though I wouldn't probably go any smaller.


After you've cut out your letters, sew them to the front of the opposite color square. I tried to sew about 1/8 of an inch away from the edge using a contrasting colored thread.


Next sew a letter square to a backing square, right sides together, using a quarter inch seam. Leave the entire top open. Clip the corners, and turn the whole thing right side out. Use a pin or stitch ripper to make sure your corners are nice and square.


Top stitch around the three sides to help everything lay flat and add a little extra interest.


I used store bought, pre-folded bias tape to string all the flags together, mostly because I was in a hurry and had it on hand. While it was certainly convenient, I doubt I would use it again for this purpose. I don't think it looks as nice as matching fabric that I cut and folded myself. The tape I had was about 72 inches long. I spaced my flags out evenly, pinned them, and sewed along edge closest to the flags. If I were making my own*, I'd consider making a bit longer.


*while I'm not going to do a tutorial on how to make bias tape, there are lots of good ones online. Just Google bias tape or quilt binding.

And voila!


13 November 2012

Happy Birthday Banner

I've loved the idea of a fabric banner ever since my friend Hannah over at Bonne Nouvelle started making them a couple years ago. November and December are big birthday months in our family, so I thought I'd try my hand at one for all the upcoming festivities. It was actually a really fun project, and I finished it in just two afternoons (probably 7 or 8 hours, a large part of which was spent just getting templates for the letters online).


Here's a closer-up shot. The contrasting colored stitching shows up a lot better in person. 


09 November 2012

Teriyaki Style Marinade

I went through a home-made yogurt phase a while ago and came to really love using it as a marinade base. This Teriyaki style marinade is one of my favorites. I use it mainly for chicken (mostly because we don't really eat red meat). Typically I cut the chicken in inch cubes, marinade in the fridge for at least an hour, spear it on a skewer, and broil it for about 5 minutes. It's also really great grilled.

1 cup plain yogurt
3 TBS soy sauce
1 garlic clove, minced
1 TBS grated ginger
1 TBS honey
1/4 cup olive oil


Tonight I used this batch on a BBQ chicken pizza, with pineapple and green peppers. Yum!